Click the graphic above to access all our novel studies!!

Tuesday, November 26

Gifts for the Roadschooling Family - RV Life

Road-schooling means limited space for carrying everyday items, and we are all about maximizing that space!  If you've got a road-schooling family on your Christmas list this year, or if you're just thinking about hitting the road yourself, here are some of our top picks for a road-schooler's wishlist...

Road-school Helpers
  • Kindle Unlimited subscription Try it with a 30-day free trial.  For only $10 / month, you have access to over a million books and audiobooks...which frees up a lot of space in your pack!
  • Car Games - These magnetic boards make board games easy to play in the car, and keep the kids happy for hours!  This particular one comes with Space Venture,Solitaire,Backgammon,Auto Race,Snakes & Ladders,Tic Tac Toe,Nine Mens Morris,Checkers,Chinese Checkers,Chess & Checkers,Ludo & Racing.  We pop them in a zip-up bag to keep everything together.
  • Physical Audiobooks - Like "Under Drake's Flag,"  are perfect for keeping the family happy on long travel days, and are educational as well.  You'll find most of the classics, currently popular books, and everything in between on audiobook....and what a way to bring history to life!  
  • Audible subscription - If you only want digital audiobooks, this one provides three books each month with membership.
  • CD carrying case - A handy dandy place to keep all of your audiobooks in one spot!
  • DVD sets - Like "The Peabody & Sherman Collection," or "Schoolhouse Rock," also provide hours of educational entertainment on those long travel days.
  • Portable DVD player - Be sure to get a headphone splitter so that your kids can share the fun!
  • Kindle - Books upon books can really eat up your available space.  I'm all for a hard copy, and running my fingers along the pages - there's something about the feel and smell of a real book that is just calming - but there's nothing calming about trying to fit two months’ worth of books into your packing space.  With an e-reader, you can download books (often free from your local library), and they all fit into one tiny space!
  • Digital Camera - We document our field trips, both for homeschooling purposes and for memory scrapbooks.  A good digital camera is a must for all traveling families!
Education-specific
    • FREE Classes at Craftsy - Perfect for hands-on classes and electives, or just keeping busy and learning a new skill when you have to sit still, these classes are broken down step-by-step and cover a wide variety of Waldorf-type topics.  (Cooking, needle arts, gardening, art, yoga / healthy living, etc.)  Once you sign up for a class, it stays in your library from now on to access as needed.  Again, they typically have good discounts at the holidays.
    • Crayola Twistables - These are our new favorite coloring tools.  They don't melt; they don't get messy; and they twist in and out for easy storage.  Also, they don't have to be sharpened!
    • Heirloom Audiobooks - These books are full of history’s most daring expeditions and greatest adventures.  They are stories of virtue and valor, daring and determination, character and courage!  Each one is like a movie in the car...
    • Brick Loot - This is the go-to subscription box for Lego enthusiasts!  (And y'all know our kids love their bricks...)  Each month features a new theme, such as "Back to the Future," "Star Wars," or "Doctor Strange," but sometimes it's just 'magic' or 'cars.'  There is a challenge booklet, bricks for completing the challenges, extra bricks, and promotional items.  We put this under 'education' because we have the kids do research around the topic and use their bricks to create entire scenes based on said research.  Child-directed learning!  Around the holidays, they typically have good discounts, too!
    • Historic Aviation / Rail / Military - We'll admit to sometimes just ordering the free catalogs for our kids to thumb through....they love history and find all sorts of neat goodies in here that lead them on bunny trails of their own research!  There are lots of great finds here for railroad, military, or aviation enthusiasts, too, which we've used as gifts for older families members in the past.

Just in Case...

    FaithBox - 
  • RFID Pouch - We love to walk around the city, but who wants to carry a huge purse all day?  This travel wallet has room for money, cards, keys, pends, and a small notebook (or smartphone), all with room to spare!  It fits discreetly under your clothing, and is designed to thwart theft.
  • Sleep Kit - A good night's sleep is the body's first defense to staying healthy...and with this sleep kit, you'll block out all of the distractions around you.  It also comes with a tiny, but handy, carrying case!
  • Stainless Multi-Tool - Emergencies happen...you might as well be prepared.  This multi-tool has the knife, axe, hammer, lever, and several other functions.  It folds up neatly, and is durable, but affordable.
  • Oregano Oil - An antiviral and antimicrobial, oregano oil helps to keep your immune system buzzing along.  When taken at the first sign of a cold, our experience has been that it knocks it out quickly.  As an added bonus, it keeps the digestive system moving, which is nice after a lot of travel / sitting...
  • This one is more for mom, and it's one of my favorite subscription boxes out there.  Each month brings inspiration and encouragement, with a book, some gifts, some edibles, and more surprises.
  • The Pocket PalatteSimply ingenious! This is a single-use, full face makeup kit for on-the-go!  Comes with mascara, lip/cheek color, and bb cream (foundation).  Each makeup item is perfectly portioned so you can carry a full face of makeup anywhere you go. It is about the size of a Post-It note and is really thin, too.  This one is a great stocking stuffer gift for the teen girls (and mommas) in your RV!

For the Book Lover…
    • Our favorite books for parents and family! -  People are always asking what we like best from the resources that we use and recommend, so just recently, we started highlighting our favorite books.  The page will change periodically, based on new input, but we don't post anything here that we haven't personally used, loved, and often-times given as a gift to others because of our love for it!
    • Bibliophile's Christmas Wishlist - When the holidays roll around, we break out the 'Christmas Box' for special out-loud family reading time.  Mom also loves reading inspirational, feel-good Christmas stories.  We've collected several pages of our favorites, across many genres, in this wishlist.
So that's it - these are our top picks for road-schooling gifts.  What would you add to this list?  Which one does your family need for upcoming travels?  

Cute & Kitchsy Candy Cane Decor

Kick up the hostess game a notch with these inexpensive, and easy-to-make, candy cane serving platters!


These cost very little and look so cute -- plus they take barely any time to make.  An older child could easily whip up a few for you (the younger ones could too, except for the oven).  When the party's over...break off a chunk and enjoy the peppermint!

One caveat -- you may want to avoid placing very hot items on the platters, in the event that they could melt a bit and give it (just-out-of-the-oven-HOT brownies??) a peppermint-y taste.

You'll Need....

Directions
  1. Preheat oven to 350ยบ F.
  2. Spray pan and parchment paper that lines pan.  This is to keep your platter from sticking and breaking upon removal.
  3. Arrange peppermints in the pan, touching and extending out to the edges of pan.
  4. Bake for 5-8 minutes, or until peppermints have just melted into one another.
  5. Remove from oven.  Let cool completely before releasing sides of pan.
  6. Load up with goodies to serve!
In addition to making Candy Cane Platters, another fun way to use these candies is arts and crafts!

Let's make:
  • Ornaments
  • Reindeer
  • Wreath

Ornaments
Traditionally, we make these cinnamon ornaments, but decided to try something different this year and go with peppermint ornaments.  We had some mints leftover from the candy cane platters, and decided to make a go on ornaments, too!


You'll Need...


Directions
  1. Preheat the oven to 350 F.
  2. Spray the entire insides of the cookie cutters.  This will prevent the mints from sticking and breaking your creation.
  3. Place the candies inside the cookie cutters.  Don't worry if it doesn't line up exactly; they will melt into place.
  4. Bake for 5-8 minutes, pulling pans out when they have melted into each other.
  5. While it is still hot, use the skewer stick to make a nice hole at the top of the ornament (while they are still in the cookie cutters...just wiggle it a bit) large enough to poke the ribbon through.
  6. Let cool completely, then gently remove from shell.
  7. Thread ribbon through the hole, hang up, and admire!

Reindeer
An oven-free activity, this is one that is perfect for younger children!


You'll Need...
Directions
  1. Wrap pipe cleaner around the bridge of candy cane (start in the middle of the pipe cleaner), and twist the ends to make antlers.
  2. Glue googly eyes to the face.
  3. Glue an M&M for the red nose.
  4. Tie a bow with the ribbon (an adult may need to do this), and glue to front of candy cane.  (You can also try these pre-tied ones.)

Wreath

You'll Need...
Directions
  1. Preheat the oven to 350 F.
  2. Spray the entire insides of the pan.  This will prevent the mints from sticking and breaking your creation.
  3. Place the candies around the inside perimeter of the pan so that they are touching, but leave the middle open.
  4. Bake for 5-8 minutes, removing when mints have melted into each other.
  5. While it is still hot, use the skewer stick to make a nice hole at the top of the wreath (while it is still in the pan...just wiggle it a bit) large enough to poke the ribbon through.
  6. Let cool completely, then gently remove from shell.
  7. Thread ribbon through the hole, hang up, and admire!

Monday, November 25

Ninjabread & Pilots - Christmas as a #BoyMom

Each year, we make these fun and easy applesauce ornaments with the kids.  It gives them an opportunity to make their own gifts, which they hand out to friends and loved ones.  We also save a few each year to commemorate their current likes and interests.  This year, we're featuring Lego Ninjago and Southwest Airlines...


Cinnamon Applesauce Ornaments

Supplies (we doubled our recipe)
Directions
  • Preheat oven to 200°F. Mix applesauce and cinnamon in small bowl until a smooth ball of dough is formed. (You may need use your hands to incorporate all of the cinnamon.) 
  • Using about 1/4 of the dough at a time, roll dough to 1/4-inch to 1/3-inch thickness between two sheets of plastic wrap. Peel off top sheet of plastic wrap. 
    • If you can't find a rolling pin, you can use a quart-sized mason jar in a pinch.
  • Cut dough into desired shapes with 2- to 3-inch cookie cutters.  Pull away extra dough, then carefully transfer cutout to waxed baking sheet with a spatula.
  • Using the spatula, straighten up any sloppy edges around the cutout.
  • Make a hole at top of ornament with drinking straw, toothpick, or skewer. 
  • Bake 2 1/2 hours. Cool ornaments on wire rack. 
  • Decorate with paint, if desired.  Add magazine cutouts with glue.  Allow to dry.
  • Using a clear spray paint or gloss paint, varnish the ornaments.  This is optional, and will make them last longer.  If you want that cinnamon smell, skip this step.  They won't last as long, but they'll smell heavenly!
  • Insert ribbon through holes and tie to hang.

Thursday, November 21

Hold the Wrapping Paper! Easy-Peasy Gift Bags

One of my biggest hang-ups about the holidays is the sheer amount of trash generated!  We began using reusable gift bags several years ago, and have seen the trash cut down considerably...  

They're very simple to make, don't cost very much, and I encourage you to give it a shot!  You're not limited to holidays, but can use these for birthdays and other occasions.  You're only limited by your imagination....

To keep costs down, we visit the local craft store and pick up remnants.  These are the bits of cloth leftover, each less than a yard long, from the bolts of cloth in the store.  You can find just about any type of cloth - from fleece to sheer - and any print!  Below, we have one for holidays and one for birthdays.
Unroll the fabric and run it through the washer and dryer.  This will prevent it from shrinking later.  Then fold it in half.  Determine how large you want your bags to be, and cut out rectangles that are 1" larger and 1" wider (this is room for your seams) than your desired size.
Fold the fabric 'wrong sides to wrong sides' (meaning that the pretty side of the fabric is inside), and run a straight stitch about 1/2" from the edge all the way down three sides of the rectangle.  Your fold might be one of those sides...leaving you only two sides to sew.  Make sure to leave the fourth side open so that you can put your hand inside!
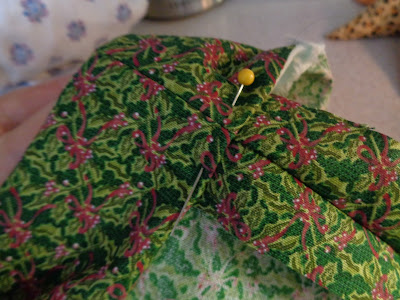
Keeping your fabric wrong-side-out, let's work on that fourth side...the one you left open.  Fold down the top of the fabric 1/2", then fold it again 1/2" so that the raw seam is tucked inside against the 'wrong side' of the cloth (you'll have three layers of fabric here).  Do this all the way around that fourth side, being sure to pin it down every few inches.  
Run a straight stitch around the bottom of that fold (careful not to run over the pins!), leaving a 'pocket' in the fold to run a ribbon or string through.    Leave a 1" opening, where you do not sew it shut, for your ribbon.  (Alternately, you can sew it completely shut, and then make a small hole later at the top of this pocket.)
Turn your rectangles right-side-out.  Some people choose to iron these flat for a neater appearance.  Since they were going straight to a kids' birthday party, we opted against it.  Select your ribbon or string for closure.  A pretty ribbon classes up the bag.  A hemp string gives it a rustic look.  In a pinch, some yarn from the craft box will suffice, too!
Run the string through the opening you left in your pocket at the top of the bag.  This is very important....tie it to a paper clip or safety pin!  (You want to keep a hold of the string to get it all the way around the opening.)  Tie the string, and slide it around so that the knot is hidden - or make it a beautiful, showy tie that you want seen.
Here are the two bags that we made in less than fifteen minutes, ready to roll for a party!  They are simple and quick.  Above are bags that our family keeps and reuses year after year.  The ones made out of old jean legs have been painted and decorated for extra flair.  You're only limited by your imagination!!

Wednesday, November 20

Serafina and the Twisted Staff + A Gilded Age Christmas unit study

With the advent of our Roaring 20's New Year's party, we're finding all sorts of ways to incorporate late 19th / early 20th century history into our studies.  Here is a Christmas unit study, easily tailored up or down for all ages, that begins with a mystery in the heart of the Blue Ridge...

What to Read
  • Serafina & the Twisted Staff - set against a backdrop of Christmas at the Biltmore House, Serafina and Braden must solve the mystery before it ruins the holidays!
  • A Victorian Christmas Collectiona compilation of cookbook recipes and newspaper articles related to American Christmas cookery, holiday customs, and stories spanning from the 1850s through the 1890s.
Music Appreciation
  • Vintage Christmas Songs from the 1900's & 1910's Medley (compilation)
    • With nearly an hour of vintage classics, this holiday set will get you in the mood to celebrate Christmas in the old-old-fashioned way!
  • Vintage Christmas Songs from the 1900s and 1910s -- stream the audio below


Classic Literature (Reading Comprehension)
In The Gift of the Magi, O'Henry brings us into a working class home to see the hardships, holiday customs, and lifestyle of this era.  Listen to the story, then complete the comprehension pages below.
At the Top and Bottom (History)
During this era, as decorations, gifts, and traditions became more elaborate and more expensive, the holiday took a more materialistic turn, beginning to push the merchandising over the religion.  'The Gilded Age' was a term Mark Twain used to show the great divide between poverty and opulence in America.  He said that the wealth and extravagance gilded (masked) the poverty and corruption.  It was an era of great contrast...

In Seraphina and the Twisted Staff, and in the video below, we get elaborate descriptions of the opulence seen at the Biltmore Estate.  Read a vivid description of Christmas in the Lower East Side Tenements of New York City, and watch the video below.  While it's easy to relive and appreciate the glorious parts of the upper crust holiday, we must remember that only a small percentage of people lived that way.  Many more celebrated in impoverished conditions, though it did not dampen their spirits.  
    Decorations & Gifts (Math)
    While they were brought to America by German immigrants, Christmas trees only became popular after Godey's Lady's Book published a photograph of Queen Victoria and her family gathered around the tree in 1850.  Suddenly, all of the stylish families wanted their own tree!  By 1900, most homes had floor to ceiling Christmas trees that were lit by candles.  Some families, such as the Vanderbilts, used electric lights on their trees at the turn of the century.

    One simple decoration for the trees was strung cranberries and popcorn garlands.  Using a needle and waxed string that was knotted on one end, they could pierce the kernels and berries to make a beautifully-colored pattern that contrasted with deep green of the tree.  It was only after lady's magazines began to showcase various tree decorations that Christmas ornaments, as we think of them today, began to become popular.  Ornaments, such as glass balls and cut tin shapes, were imported from Germany.

    Harper's Bazaar Magazine published, "Love is the moral of Christmas...what are gifts but the proof and signs of love!"  Gift giving came to symbolize the importance of a relationship.  Those who were closer to the gift-giver, or who the gift-giver revered more, were lavished with larger gifts.  An 1894 newspaper advertisement suggested to shoppers that, "while busy buying things for Christmas, think of other children who are less fortunate than your own."  Stores would sell marked-down goods to be given to the poor as an extension of Christian goodwill during the holiday season...and thus the Angel Tree was born.  This was an attempt to dissension between religion and materialism.

    Complete these math problems:
    • You have 300 cranberries and 525 kernels of popcorn.  Design a pattern for your tree garland that uses all of the pieces.
    • Your family bought a 106" tall tree.  How much will you have to cut off the bottom for it to fit in your parlor?
    • Glass balls are 3c each, and tin shapes are 2c each.  Using exactly one dollar, how many of each ornament will you buy to decorate the tree?
    • Using the Macy's Mail-Order catalog, plan on Christmas gift purchases for your family with a total budget of ten dollars.

    Christmas Recipes (Home Ec)
    Figgy pudding, of the 'oh bring us some figgy pudding!' fame, originated in 14th-century Britain as a way to preserve food.  It was originally served as a fasting meal in preparation for the Christmas season.  Interestingly, the dessert was banned in 1647 by Puritans, but reinstated as a Christmas tradition by King George I.  The recipe became standardized in the 19th century, and resembled our modern-day version.

    Ingredients

    • 12 dried figs, chopped
    • 1/2 cup raisins
    • 1/2 cup water 
    • 1/2 cup orange juice
    • 1 1/4 cups all-purpose flour
    • 2 teaspoons baking powder
    • 1 1/2 teaspoons cinnamon
    • 1 teaspoon ground ginger
    • 1/2 teaspoon ground nutmeg
    • 1/4 teaspoon ground cloves
    • 1/4 teaspoon salt
    • 3 eggs
    • 1 cup brown sugar
    • 2 cups plain bread crumbs
    • 1/2 cup unsalted butter, melted
    • 1 cup dried cranberries
    • 2 cups whipped cream (optional, for serving)
    Directions
    • In a small sauce pan, add chopped figs, raisins, water, and orange juice and bring to a simmer. 
    • In a separate small bowl, whisk together flour, baking powder, cinnamon, ginger, nutmeg, cloves, and salt.
    • In a large bowl, whisk together eggs, sugar, bread crumbs, and melted butter. Once combined, stir in fig mixture (let it cool slightly) and dry ingredients.  Use a flat spatula to fold cranberries.
    • Butter a large Bundt pan. Add a few cups of water to another pan that is large enough to hold the Bundt pan. Place the Bundt pan into the larger pan (like a roasting pan) and make sure the water comes at least halfway up the side of the pan. Adjust water levels accordingly.
    • Scoop thick pudding batter into buttered Bundt pan, smooth it out, and cover with foil. 
    • Cover and bring water in larger pan to a simmer, reduce heat to low and let pudding steam for 2 hours. Check water levels every 30 minutes or so.
    • After steaming, let the pan cool and then remove it from the water bath. Remove foil and flip it over so pudding comes out.
    • Slice and serve with whipped cream!

    Letters to Santa (Writing)
    ... there would be no childlike faith then, no poetry, no romance to make tolerable this existence ... Nobody sees Santa Claus, but that is no sign that there is no Santa Claus. Nobody can conceive or imagine all the wonders there are unseen and unseeable in the world...  ~Yes, Virginia, There Is a Santa Claus


    If you've ever confused Father Christmas and Santa Claus, you're not alone!  They are actually two separate stories.  Father Christmas was a sign of returning spring, and usually dressed in green and showed up at midwinter festivals.  Our modern-day Santa evolved when the Dutch immigrated to America, as they brought Sinter Klaas and his holiday gift distribution!  Thanks to C.C. Moore's 'A Visit from St. Nicholas,' children had visions of sugar-plums and lots of Christmas hope and dreams!  

    Pretend you are a boy or girl of the late 19th century.  Write a letter to Sinter Klaas.  Try to make it about a page long.
    Snowball Dinner (Arts & Crafts)
    The Victorian Christmas dinner often had a separate table for children that was adorned with special, whimsical decorations and gifts.  The table's centerpiece was a large snow globe filled with hidden gifts.  Candles tied with ribbon led from the snow globe to each plate, leading each child to his or her surprise!
    To design your own snow globe centerpiece:
    • Cover a hollow globe (or round fishbowl) with cotton batting.  
    • Set it inside a wreath laid flat on the table.
    • Place a small gift inside for each child.  Tie each gift to a long ribbon.
    • Fill the opening of the globe / bowl with holly and mistletoe.
    • Decorate the table with pretty holiday dishes.  They make disposable holiday dishes, if you're not sure about letting them use the good china...
    • Place the other end of the ribbon underneath the plates.  (One ribbon goes to each plate.)
    • Let the children choose where to sit, and that decides their gift!

    Tuesday, November 19

    LitWits {Review}

    Y'all know that we LOVE schooling through literature!  When we had the opportunity to try out a few of the LitWits Kits from LitWits, we totally jumped at this.  The hardest part was figuring out which one to use first....

    LitWits kits are literature-based unit studies.  Each is approximately 30-40 pages long and includes discussion questions, comprehension and vocabulary, hands-on projects, crafts, cooking projects, and more.  The idea behind them is that students are getting an in depth look at a subject or era, depending on the book selected.


    When you purchase your LitWits Kits, they are yours to keep forever.  You can download the files, but also have the option of accessing them in your account online.  We chose to download the one we were currently using, including both the activity files and the printable worksheets, to have on-hand in case the internet went out.

    Your kits stay in your account, and you can easily access them any time by clicking 'Access my kit.'  There are also links to ways to use, where you can get further ideas for that particular book, and kit reviews (to see how others have used that book). 

    The kits include:

    • Prop Ideas - These are objects that will help bring the story to life for readers.  As our kitchen already looks too much like a school, we opted not to use any of the props ideas, but if you have a dedicated school room, they would be a nice addition to the unit.
    • Hands-On Fun - This section includes activities that range from building something to acting out a scene to hosting a discussion group.  Each kit has different activities, but there are usually about four of them.  As a teacher, this is one of my favorite sections because it helps to bring elements of the story to life.
    • BookBites - These are recipes that either have significance in the story or are culturally appropriate (based on setting).  For Roll of Thunder, Hear My Cry, we made a pan of cornbread and a pot of beans, as this is what Cassie and her Mama are often making to stretch their meager rations.
    • Takeaways - This section is about the bigger picture.  With younger children, it's easy to gloss through this section, but with older kids it definitely serves as a jumping off point for deeper discussions.  With some of the kits, be prepared to answer the uncomfortable questions.  This is a section where teaching values comes into play.
    • Handouts - Provided in a separate download, this is the written academic portion of the kit.  Story elements, writing practice, geography, and history are some of the pieces touched upon in these worksheets.
    • Learning Links - Including 'About the Author' and 'Story Supplements,' this is a collection of website links for further exploration.  There is also a link to a Pinterest board that relates to that specific book.
    LitWits Kits for High School
    The Tempest and The Hobbit are definitely good for high school, though they work for all; and because of advanced language and length, Treasure IslandAround the World in Eighty Daysand Journey to the Center of the Earth also straddle multiple grades levels. But having said that, many of these titles have teen protagonists whose stories are relatable to older kids, and/or circumstances that suit mature kids—for instance, Johnny TremainIsland of the Blue Dolphins, and The Circuit

    Roll of Thunder, Hear My Cry LitWits Kit 
    The story focuses on racial relations in Mississippi during the Reconstruction Era and into the Great Depression.  The Logan family struggles to navigate a racist society in 1930's Mississippi.  The children encounter racism and intolerance at the schools, in town, at local stores, and soon lynchings and hate crimes begin to occur.  Meanwhile, the Logan family tries to maintain their land and dignity through the difficult times.
    This was a timely book, given the age of the boys and the current tensions and climate in America, so we took our time going through this kit as it sparked many lengthy discussions.  While it may be available to younger readers, I would recommend waiting until kids reach the double digits (ten and up) before tackling it due to the sensitive issues and some of the graphic descriptions in the book.  It's not something to shield our kids from, but something that parents should be aware of before beginning to read together.

    We spent most of the review period on this kit.  We read the book aloud together as a family, and then went through the various elements of the kit.  We looked at current events to draw parallels between the 1933 of the book and modern-day America, and found that racism is still alive and thriving, though not always in the ways that people want to declare.  As part of the unit, we also cooked up a mess of beans, greens, and cornbread, which was super yummy!  

    As part of this review, we also checked into:
    • The Hobbit LitWits Kit - This is one of the boys' favorite books, so it took us considerably less time to get through it as we had all recently read it.  Their favorite hands-on project here was making an elvish sword.  They took an old yardstick, shaped it, created a cardboard hilt, and painted it to look like one of the swords used in The Hobbit.
    • Around the World in 80 Days LitWits Kit - We did not get to this one during the review period, but a peek into the pages shows that it focuses heavily on world geography.  This would be a fantastic kit to use as the spine in a co-op setting for geography class!
    • The Mixed-Up Files of Mrs. Basil E. Frankweiler - Another one that we haven't gotten to yet, but looking through it, the kit focuses on New York City and the Metropolitan Museum of Art.  This would make a nice introduction to art through hands-on medium.  The cooking projects are all about perspective, and there are some geography and travel elements as well.
    Around the World in 80 Days focuses heavily on geography and travel, especially during throughout the British empire.

    The Hobbit teaches about Norse mythology and focuses on the character trait of courage.  The kids enjoyed designing Elvish Swords from this kit!

    See what others are saying about LitWits Kits at the Homeschool Review Crew!
    Crew Disclaimer